Showing posts with label Burda. Show all posts

Tuesday, July 29, 2025

It's a Tracing Day!

I have many, many patterns that I would like to make -- but many of those necessitate tracing them first. This can keep me from getting to them in a timely manner. So I decided that it was time for another tracing marathon! (well, marathon for me, I can usually manage four or five before I am done). 


I started with a retro KwikSew top that I picked up fairly recently, and have the perfect yellow fabric to match it. It was pretty simple, only a few pieces but one is really large because of the blouse front pleats! 


Then I moved on to a few Burda magazine patterns. These always require a lot of concentration! I usually highlight the lines I need with a Frixion highlighter so I can see them better, and then iron off the marks when I'm done. This time I noticed that I am going to need a new highlighter soon...

Next step, of course, is to cut some of these out and get sewing. I'm finding that my urge to actually sit down and sew is a lot less frequent that my urge to look at patterns and think about what I am going to sew. Gotta find a balance there so I can finish some summer sewing before summer ends. Always the struggle, haha! 


I have matched up a couple of fabrics with some paper patterns, though, and so I have a lot to get cutting and sewing. We'll see how it goes...


Wednesday, March 12, 2025

Burda Knit Dress in 80s Style!

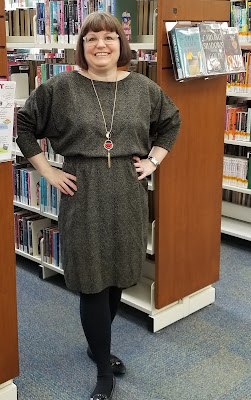
I finished the first project from my 2025 MakeNine list! Actually it's the first garment I have made for myself this year! It's a knit dress, Burda 121-11-23 -- I was drawn in by its 80s silhouette, with those great sleeves :) 

I had a lightweight sweater knit in my stash so decided to use it up on this dress, which I was hurrying to finish before the weather warms up. I made a few small changes to the dress, not many, mostly for fit and style preferences. 


I didn't shorten the length, as I wanted it to end around my knees, not shorter as it appears in the original. I did shorten the sleeves, however - I have shorter arms so always do this. This time I took an inch out, and made a 1.5" hem. I also adapted the neckline, as a super wide boat neck doesn't work for me, and also Burda necklines are usually wide for me to begin with. I took an inch out of the centre front & back width at the neckline, and I also added another inch to fill in the curve at the shoulder. It's still a wider neckline but won't be falling off my shoulders now. 

The other change I made was to add in some pockets. It was very easy to add in some side seam pockets (using broadcloth to minimize stretching). I added them first, and then when attaching the elastic casing on the inside at the end of the process, I made sure to catch the tops of the pockets in the stitching so that they would be held to the front and given a little more security as well. That should avoid any sagging in the line of the dress. 


I think this is a fun dress and because it's a lighter weight sweater knit, I can wear it longer into the spring and again earlier in the fall. Nice touch of print in it to relieve any solid black, but a more subdued look when I don't feel like wearing jewel tones. I do find I always like a Burda pattern. 


Friday, January 10, 2025

Modernizing an 80s Burda tunic

I made one last 2024 project which I finished on Dec. 31 - just squeaking it in! The PatternReview Modernize Vintage contest helped me to hit that deadline, as I was inspired to get going on this project by that contest. Even though this is barely vintage (mid-80s) and I didn't make too many changes to it, I still enjoyed making it a lot and love the result!

It's a combination of 2 things from my stash that I've been wanting to use for a while. First is this great Burda pattern -- Burda 4709 -- which has the tunic view but also a knit skirt, pants, and even stirrup pants  - remember those?? 


I have been meaning to make the plain tunic for a while and I finally put it together with this fabulous fabric. It's a Dries van Noten scuba knit, which I won from EBT Fabrics last year. There was 1.5 m of it and I was never certain what to make with it. But it was perfect for this top. 

I made a few changes to modernize this pattern, aside from the fabric choice. I shortened it a bit, and most importantly, removed the massive 1/2" shoulder pad allowance from the pattern -- you can see the shoulder pads on the pattern cover, and I did not want that much of an 80s vibe ;) I remove it using Sandra Betzina's technique, which works very well. I think I could have brought the shoulder seam in a bit more but this is still wearable. 

The pattern has huge patch pockets as well, which I like. But this fabric was tough and really did not like pins. I ended up using clips to hold the seams together while I sewed, but when it got to the pockets I was stumped for a minute. How to fix them down to edgestitch? I finally came up with the idea to tape them down with basic scotch tape. That held them in place long enough to stitch, and then I carefully peeled the tape off. I did the same thing for the bottom hem, but just held the sleeve hems as they are quite small. 


This is a fun item, and very colourful indeed! I think I'll enjoy wearing it, as I love the colour and the style. The only thing that I'm not as excited about is the fabric itself, which feels very poly, despite being designer. But I'm glad I found a way to use it, anyhow. I want to start wearing all the fun, bright fabrics in my stash.


Friday, December 6, 2024

Basic Black with Burda

November brought a new contest challenge over at PatternReview, the Mini Wardrobe challenge, in which you were to make 5 coordinating items in 5 weeks. I was thinking about it for a while, and realized it would be very unlikely for me to make that many things in such a short time frame. However, I did put together some fun ideas, the initial one being the Merchant & Mills Factory top that I just shared. The whole concept was built from that piece. 

I thought of making a red blouse, a cream sweater or jacket, and a black skirt to go with it, and maybe a fun print dress. Of course I just finished the top, but now have completed the black skirt. The other projects will have to have their turn another day ;) 

But I am very pleased with the black skirt that I chose for this outfit. I had just enough black twill left from another project to make a new Burda pattern - I used #117 from the Dec 2022 issue. This skirt has everything I like - slash pockets, a waistband that sits at the natural waist, and a lining. I was able to make the whole skirt from fabric from my stash, which was an added bonus. I realized after I'd cut the waistband that I added seam allowance to it, as with all the other pattern pieces - but the waistband is a rectangle that already includes S.A. so I had an extra wide and long piece. But this worked out in my favour! 

The front of the skirt has two pleats on each side, just before the pocket openings. This is quite nice. I did find the pocket bags a little shallow and will extend them if I make this again; I like to be sure my keys aren't going to fall out. 

The zip closure is at centre back, and is supposed to be a 9" invisible zip that goes up to the top of the waistband. I find that messy sometimes, though, so I used the 8" zip that I had and inserted in only in the skirt piece. 

This is where the excess waistband came into play. Because my waistband had extra length, I was then able to create a 2" underlap on the left side, and add a skirt hook and eye. I prefer this closure over trying to force a zip up past a bulky seam. Plus I like to add the waistband after the skirt and lining are sewn/basted together, as I find it's a much neater finish, for me. It worked out perfectly but I do find in wearing that the back is a little tight and so I have wrinkles - should have added another inch to the back width. Still wearable though, especially if I iron it before taking pictures ;) 

I also lengthened it by 2" but because there is a slight A-line shape to it, I didn't have to add a walking slit to the back (the shorter length wouldn't need it so there wasn't one in the pattern). I actually love this skirt a lot and would definitely make iy again. I love the way it fits (slightly higher waisted to work with shorter tops like my Factory top) and the pocket/pleat combo sits really nicely on the body, no puffy bulges to worry about ;) I can always use a basic black skirt, and this pattern might just be my new winner. It's comfortable, pretty easy to sew, and I like the details. Very happy with it. 


Thursday, September 12, 2024

A Real Green Dress, with Burda May 2023


I feel so thrilled by the fact that I have actually made something else on my 2024 MakeNine list! And I even used the fabric I had intended for this pattern :) I cut this Burda 115 from the May 2023 issue from a linen blend that's a bit heavier than I'd recalled. 


This fabric, from the sale table at Fabricland, was just okay -- when I washed it and laid it out, I realized had a few discoloured areas where an almost shadowy bluer dye was splotchy on the surface. Thankfully I was able to cut around most of these bits, but it did mean I used more fabric than technically required, and oh boy does it crease quickly. Lots of pressing ahead!

But the colour, when clear, is wonderful & I really enjoyed making this. The front tucks were what first caught my eye about this pattern & I had fun with that detail. I have been wanting to add some extra elements to some of my projects, and these tucks convinced me to try this pattern. 


There are also integrated pockets in the side panels, which are nice. Pay attention to the pattern pieces when you are cutting this out though, to be sure to connect the pocket bags to the body and cut together, or you'll have to add an extra seam.

I cut it at my usual Burda size of 42/44 but think I could have done 44 all through. It's much closer fitting at the shoulders and bust than the cover image on the magazine makes it seem -- I think the model may be wearing a size larger than her measurements might call for. Or maybe it's just my fabric choice.

Overall I feel like this was a good project, and I'm happy with the results. I don't like how to darts are fitting - they are not pressing firmly and giving a weird crease. But other than wanting to fix up the darts a bit I do like this one. When I adjust the darts I think I'll like it even more! 


Tuesday, April 23, 2024

Burda Knot Front top

PatternReview is running an upcycling contest this month, and that gave me the push to try a project I've been thinking of for a while. I received quite a bit of fabric, including a few finished projects, from a friend a year or two ago. One item was a gorgeous blue shift dress in a linen/cotton or rayon blend, I think - anyhow it's beautiful. I tried just fiddling with it a bit to see if I could make it fit me but it never worked. The neckline & shoulders were just too big, and the hip area too small. 

So I took the plunge and cut it up! I laid out a few simple tops but found that this Burda top (109-08-2021) worked best with the available fabric. Plus it has this very cute knot feature at the neckline, which I have wanted to try for a while now!

I cut everything out except for the armhole facings; I ran out of enough fabric to cut these longish pieces. I could have pieced the remaining bits and probably had enough, but didn't want a bunch of seams on the arm facings, might be uncomfortable. I looked through my stash of vintage bias binding and found one pack of a perfect blue. So the armholes are finished with binding instead!

Another change I made was to cut the back piece across the existing back seam of the dress. There is a back neck slit in the pattern but I sewed together the neck facing and tested it to see if I could get it over my head without unpicking the back piece to get an opening. It fit very easily. So I didn't put it the back slit. I always hate that fiddly button loop anyhow, haha. 


I cut this in my usual Burda size, 42 at the neck and 44 at the hip. There is not much leftover scrap fabric from this one, and I'm so pleased that I can wear this glorious fabric now. It will be a great piece for summer days! 


Tuesday, March 12, 2024

Two Tone Burda Top

I finally finished this project which I've been thinking about for ages, and cut out in February! For some reason it took me a while to finish this Burda 6354, even though the pattern is pretty simple to put together. The fabric I chose is lovely but also a bit shifty, so needed careful sewing. 

The colour choice is influenced by the colours of Ukraine; when I saw these two fabrics side by side at Fabricland, I immediately thought of a project like this. It's a fairly easy pattern -- there are match points for the gathers and corners, and you can use prints, or solid colours like this, to add some verve to the design. 

There are two views, one shorter with ruffled short sleeves and one with full length straight sleeves that is a bit longer. I used the longer length with the shorter sleeve. The only closure is a button at the back neckline slit, so it's not very complicated to put together. It took me a while only because I wasn't getting in much sewing time over the last couple of weeks, and because the fabric is so soft and slippery that I had to be careful with both pressing and stitching. 

In any case, it turned out like I'd imagined it, and I really like the fit. Not too oversize in the shoulder/bust but nice and swingy otherwise. I also like the sleeve design. A lovely project once I finished it! 


Tuesday, February 6, 2024

Burda Swing Top in leafy print

The Make a Garment a Month Group on Instagram had a January challenge -- "Jungle January". I really wanted to make something as I had two excellent fabric choices in my stash. After some waffling, I decided to reuse a pattern for a swing top from Burdastyle magazine which I've made before (Burda 115-11-2018). I had just enough fabric for this easy top. 

My fabric is a light and stretchy knit, so I used straight stitches on the shoulders to try to keep them from stretching out too much. There is supposed to be a bit more gathering on the shoulder seams but I found that the weight of the shoulder seam has reduced the effect a bit. I'm thinking of going back in and stitching a small piece of elastic to the shoulder seam to regather and hold the gathers too! 


Otherwise this was a quick and fun make. I'm used to the pattern now, with all my adjustments (mainly adding 3" to the hem length) even if it does look a little different in each fabric I've used. I love the bright green (more vibrant in real life) and the rayon knit is super soft to wear. 


This is a fun silhouette and I do love an oversized top with a straight skirt. I'm wearing my staple knit skirt, the free Lindy Skirt from Itch to Stitch (with added pockets) which I wear constantly. Burda does have some fun designs and I'm glad I saw the IG sewalong to give me a bit of a boost to make this top. I got it done on the last day of January, so just squeaked in to the sewalong, but would definitely would not have finished without a deadline! Do you enjoy contests/sewalongs/challenges? I often find them stressful, but in this case, I had something in my long-term queue that fit into the challenge and this gave me enough of a kick to get going on it. I'm finding I like these deadlines more and more ;) 

Anyhow off to swish around in my flowy new top! 


Friday, January 12, 2024

First Make of 2024: a pretty pencil case

The first item I've made for myself in 2024 is unusual for me -- I've made a pencil case! I don't often make small things like this, but I really needed a pouch for my nice pens that would stay with my bullet journal. When I was putting together the list of free Christmas project ideas, this little Burda pattern stuck with me. I have the original magazine so used that, but you can also find this pencil case pattern on the Burda website. 

It was quite straightforward. I used two pieces of cotton that are stuck together with fusible, then you wrap them around and stitch a zipper in. I had a gorgeous rainbow zip that was perfect for this, although it was a bit shorter than the pattern called for. Fortunately, I was planning on shortening the pouch anyhow, since my notebook was a bit smaller than it was designed for. The zip was 7/8" shorter than the pattern wanted so I shortened my pattern pieces (rectangles) by the same amount. 


The only difficulty I ran into was stitching the zip in. Although the pattern doesn't say so, I think that a separating zip would be a LOT easier to install. As it is, I just stitched the last inch or so of the second side down by hand, since I couldn't twist the little tube around enough to manage by machine. It was pretty quick, although I do recommed a thimble since you're stitching through two layers of stiffened cotton plus a zipper tape. 

The extra cool thing about this pattern is that there is elastic sewn in to the ends, so that you can loop it around your notebook. This helps me to keep it closed, and to have a nice pen and anything else I might need handy at all times. 

I really loved the combo of the brand new fat quarter that I used for the outside, with its astronomical theme, and the lining which was a very old marbled print cotton in the same colour tones. They match nicely with this year's notebook, too! 

What a fun way to start the sewing year, by making something that will help to keep me organized. I really enjoyed making this, and love using it, too!