Showing posts with label 80s style. Show all posts

Friday, March 28, 2025

New Fabrics & Projects!

I've been doing okay with not buying much new fabric this year so far. But I had some gift certificates from Christmas to use up, so this week I had a bit of a splash out at Fabricland!

There were a couple of rayon fabrics I had been keeping my eye on, and they were on sale this week. Unfortunately when I held one of them up I realized the pattern had a definite stripe to it, which I didn't like. But the other one, a geometric 80s style print, was great. I bought 2 m. and am thinking about making a big 80s blouse of this one ;) It has all the colours of my wardrobe palette in it, so hopefully it will match most of my current wardrobe!


But as I was busily getting this rayon cut, and talking to the clerk, my husband was wandering around -- and suddenly appeared with a bolt of this fabulous cotton. If you look closely at it you'll understand why I had to buy some immediately! Not sure what I'll do with it yet but I love a novelty print!

Meanwhile, counterbalancing this impulsive purchase is the current project I've just cut out. As you might note, there are some large pieces here; I've cut it out of a thrifted sheet and hope it all works out....... I'll keep it a mystery until it's ready to share, but so far it looks hopeful that I'll have it done in a few days. 


So a little in and a little out. This month has landed me more on the "IN" side but I should be able to get back on track next month and get some fabric "OUT" of the stash as well. I'm hoping to avoid a fabriclanche in the sewing room ;) 

Friday, January 10, 2025

Modernizing an 80s Burda tunic

I made one last 2024 project which I finished on Dec. 31 - just squeaking it in! The PatternReview Modernize Vintage contest helped me to hit that deadline, as I was inspired to get going on this project by that contest. Even though this is barely vintage (mid-80s) and I didn't make too many changes to it, I still enjoyed making it a lot and love the result!

It's a combination of 2 things from my stash that I've been wanting to use for a while. First is this great Burda pattern -- Burda 4709 -- which has the tunic view but also a knit skirt, pants, and even stirrup pants  - remember those?? 


I have been meaning to make the plain tunic for a while and I finally put it together with this fabulous fabric. It's a Dries van Noten scuba knit, which I won from EBT Fabrics last year. There was 1.5 m of it and I was never certain what to make with it. But it was perfect for this top. 

I made a few changes to modernize this pattern, aside from the fabric choice. I shortened it a bit, and most importantly, removed the massive 1/2" shoulder pad allowance from the pattern -- you can see the shoulder pads on the pattern cover, and I did not want that much of an 80s vibe ;) I remove it using Sandra Betzina's technique, which works very well. I think I could have brought the shoulder seam in a bit more but this is still wearable. 

The pattern has huge patch pockets as well, which I like. But this fabric was tough and really did not like pins. I ended up using clips to hold the seams together while I sewed, but when it got to the pockets I was stumped for a minute. How to fix them down to edgestitch? I finally came up with the idea to tape them down with basic scotch tape. That held them in place long enough to stitch, and then I carefully peeled the tape off. I did the same thing for the bottom hem, but just held the sleeve hems as they are quite small. 


This is a fun item, and very colourful indeed! I think I'll enjoy wearing it, as I love the colour and the style. The only thing that I'm not as excited about is the fabric itself, which feels very poly, despite being designer. But I'm glad I found a way to use it, anyhow. I want to start wearing all the fun, bright fabrics in my stash.


Friday, September 6, 2024

The Last of the Summer Roses: an 80s pattern

While I was taking a blog break, I did a bit of sewing. Not a huge amount, but I made a couple of summer dresses to add to my closet. The first one was this 1987 McCalls 3220, a pattern I thrifted a while back. 

The very trim dress is hiding on the pattern cover, you only see past the boxy dull jacket when you look at the line drawings. This kind of simple silhouette is one of my faves, especially the cut on drop sleeve, so I grabbed some rayon from the stash to try it out. I've had this fabric for a few years but heard that roses were in fashion again this summer so thought I'd better use it ;) 

This was quite an easy make. I had to make a few length adjustments, and I cut it at 14/16/18 like usual, which gives me most of the circumference adjustments that I need. The bodice and skirt are cut separately and an elastic casing added at the waistline. There is a back slit at the neckine but I find I can pull this over my head if I'm careful so may leave it off next time and just lower the neckline slightly. 


There are pockets, of course! This fabric is so soft and lovely to wear, and I really like the way it fits. It doesn't pull in any part of the dress, and yet covers the underarm area well so there is no bra flashing.


I like this length, and may just have to make this one again with more old rayon in the stash. It works well under a jacket as well, although a few wrinkles may appear at the shoulder. Even though I'm not as keen on florals as I used to be, the strong colours and larger print do it for me here. 

Anyhow, very pleased with this one. I really do love 80s patterns! And I finally got to take some pictures at a location I've been meaning to use for a while, the entrance to Upper Queen's park, near the theatre, where some old cast iron dogs were installed many, many years ago. They used to grace the entrance to a grand home belonging to a local doctor - you can find the story on the fascinating StreetsOfStratford.ca if you're interested in that kind of thing! 


Wednesday, January 24, 2024

Vogue Xmas PJs


I almost forgot to share the Xmas sewing I did in 2023! Well, there's not much (aside from a lovely scarf I made my sister). My holiday sewing was mainly a pj top from a Vogue 80s pattern in my stash. After sharing my own new sleepwear, I thought I'd share one that I made for the husband, too. 

This was a request, for a warm shirt for sleeping. I used Vogue 7079 from 1987, so the sizing was  generous. Instead of the medium that matched his measurements, I took this down to a loosely cut Small, which ended up being somewhere between the S & M sizes. It was perfect. A closer fit, but still loose enough to be comfortable sleepwear. 

The beautiful cotton was found on sale at Fabricland shortly before Christmas. It washed up beautifully and was soft and great to work with. The most complicated part of this was cutting it out so that the plaid matched. I think I did pretty well across the front and sides, but I calculated the sleeve matching incorrectly, so it's offset instead of a straight match. I still think it's okay. 

The collar was a bit tricky, as it was inset, but once I got it all pinned and clipped, it sewed in quite nicely. It was the most time consuming bit of sewing, for sure. I wasn't sure I was going to add a pocket or not, but it was asked for, so I added one cut on the bias for interest.

 The sleeve just has a simple turn under and stitch hem, so that was quick - no fancy finishes to worry about. 

And when it was time to put buttons on, I looked through my extensive stash of thrifted buttons, where there were many plain shirt style buttons which worked but were kind of boring. Then I came across this set of recently thrifted buttons that have a yellowy-green centre, and they were perfect! Love them, and they match the tones of this so well. I was happy to use them on such a satisfying project. 


I don't often make things for other people, so I do find it a little nerve-wracking, but I think this one turned out well -- it looks nice and fits well. What more can a person ask? :) 


Wednesday, April 26, 2023

1986 Blouse in Upcycled Rayon


This Style pattern was one I had on my wishlist to make at the beginning of this year. It all came together to convince me to make it now, as there is a blouse making challenge on IG, as well as the return of The Refashioners, AND a challenge to sew with some Viva Magenta. 


This was a perfect fit for all of that. It's a pattern from 1986 that I thrifted a while back. The price on the back for Canada is $6.75, which I think would have been a pricey pattern back in the mid-80s. And for such a simple design! The cover images look like there are some big shoulder pads in there, which I would have expected of a pattern of this vintage; however, there are none called for in the pattern. 


I used a half-made dress that I was given a few years ago. The rayon print is beautiful, and there are swirls of magenta in that print! I had first taken the bodice off and made a simple elastic waist skirt from this fabric but found I wasn't wearing it much in that form. And the print is too lovely to waste. Thankfully I had kept the bodice in my scrap bin, so I unpicked the skirt from the elastic and used that to cut the main body of the blouse. It was slightly too short on the left side of the pattern that had the button extension at the shoulder, so I ended up piecing a bit onto that side to get enough length. This print hides those extra seamlines well. 


I used part of the bodice to cut the collar pieces, and scraps from the skirt for the two small facings. There is still a little of the bodice left so I will reuse that in future! I dug through my button stash and finally decided on some plain black buttons that have a little extra with a white streak that runs through them. They were also from a big batch of random buttons given to me a few years ago. 


The blouse is a little shorter than designed (about 1/2") just because I had to fit it onto my skirt pieces. But I think it works. The front is fractionally shorter than the back but there are slits in the side seams so that's not an issue either! I cut a 14 at the neck and shoulder, and 16 the rest; however, I also added about 1/2" in width to the side seam, starting at the waist point and grading out to the hip. This shirt is basically a rectangle, so if I hadn't added that extra, it would have been too tight around my hip. 


I love this silhouette and may try one of the other views someday. The buttoned up one definitely caught my eye first, though, and I enjoyed making this simple, purely rectangular top that is a great piece for under a jacket. The original dress that I recut this from had some thin shoulder pads already covered in this fabric, so if I can find where I put them when I deconstructed this dress originally, I think I will add them in to give it just that touch more of the cover look!


Tuesday, March 21, 2023

Purple Dolman Top for a Retro Feel


This fun top was inspired by the fabric -- I got this soft double sided knit in a fabric swap at my Garment Guild in December. I've been wanting to make an 80s style dolman top ever since! I finally got around to it, and I really like it. I used McCalls 8024, View B -- that's the view with the longest length and sleeve cuffs. The shape is fantastic, just what I was looking for.


I didn't really make many adjustments to this at all. I didn't shorten the body or sleeve at all, the only thing I changed was to narrow the neckline at centre front and back by 1/4" each and shorten the neckband slightly to match. This one cut and sewed up very quickly and easily. 


The only real issue I have with it is that it is a bit staticky so sometimes clings to bits I'd prefer it didn't cling to ;) But I love how the soft knit drapes and how soft it is to wear.


I'm not a huge fan of polka dots, so used the striped side as my main fabric. But then I thought, why not use the dotted side as a contrast, so cut the neckband and cuffs the opposite way. I like it.  But stripes don't like to photograph too well so there are some funny distortions in these photos - and these are the best ones!


This was a fun one to make, and the pattern worked out very well with hardly any adjustments. The fit and natural ease in it are just right - not gigantic but nice and full. I have fulfilled my 80s dreams with this top, and it pairs so well with my thrifted beads! Super fun to make, and really comfy to wear - plus in a colour I love that doesn't show up in my closet enough. A win for sure. 


Tuesday, December 13, 2022

Black Burda Dress, 80s Style!

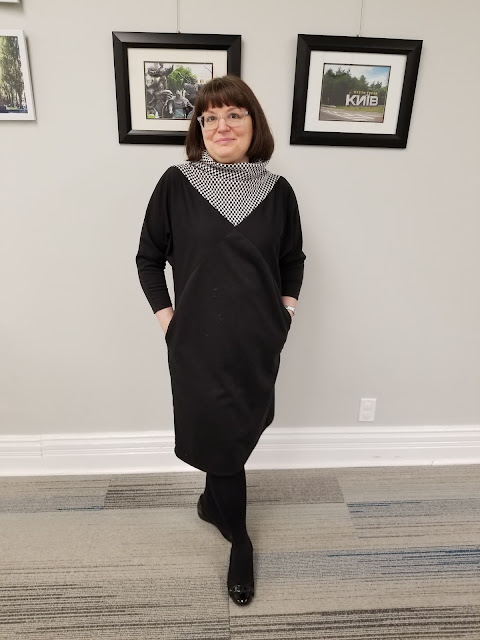
It's close to the end of the year, but I think I've just made a favourite for 2022! I bought this unopened  Burda 7169 (c. 1983) at the thrift store last year, and have been meaning to make it ever since. But I found some black ponte and a great checkerboard knit remnant at the fabric store recently, and it finally came together. 


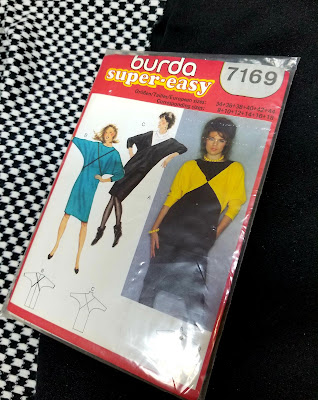
This pattern has interesting seam lines, even if they aren't highlighted in my version. I chose View C, the one with the cowl neck and the one that is made from knit in the directions. Both of the other versions can also be made in wovens, and they have a centre back zipper to manage it. But I definitely wanted the squishy neckline in this checkerboard knit. 

It has fairly easy construction; there are 4 pieces, pretty much identical for front and back. And then some small side seam pockets. (I enlarged the pocket bag but the hand openings are pretty small so I'd also increase the length of the attachment seam next time to give me more room there). 


I like the way that these intersecting seams are put together -- no sewing of angles here, you sew one side piece to the main body, then sew the neck and other side piece together, and then attach those two long straight seams. The key is to pin well at the matching seams that will create the point. I had to upick a bit because I got a bit of a jog there, but the second time it worked perfectly. 


I didn't follow their pocket instructions as they seemed quite complicated with flipping them around a bit. I just sewed them in like any other side seam pockets and it worked well. I sewed the whole dress with a narrow zigzag, but on the pocket seams I used a straight stitch because I don't want those openings to stretch out. 


The only real change I made was to add 1/2" to each side seam, to give me about 2" more across the hip/butt area. I'm glad I did or I wouldn't have to been able to get into this one comfortably. The 80s silhouette of big shoulders and small hips isn't mine so I always check those measurements before starting out. The seam allowance was 5/8" but I sewed the under arm and body seams at 1/2" for a pinch more space as well. I really like the shape of the dolman and how it tightens up nicely at the wrist - I just did a turn under and stitch hem at sleeve and bottom hem, and it is sufficient. 


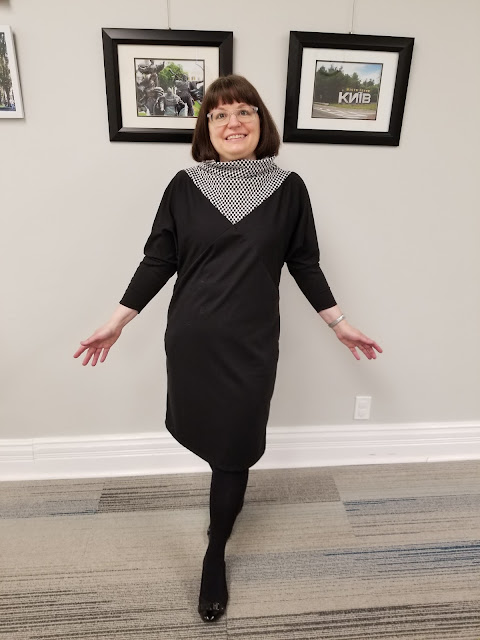
I love this dress! I'm really into checkerboard prints right now so love that I found one for this style. And this dress is comfy and cozy, rather like secret pyjamas even if it does look more 80s chic. And I had a matching mask that I made last year so it was perfect. It was fun to wear, and very comfortable too. A real winner!