Showing posts with label stitching. Show all posts

Sunday, March 23, 2025

Weekend Review: Connecting with Nature

Connecting with Nature / Tilly Rose
Tunbridge Wells, UK: Search Press, c2025.
128 p.

This book is a little different from the previous stitching books I've mentioned this month. It's more of a mixed media approach to craft. Tilly Rose is an artist from the UK, and this book reflects what I think of as the English aesthetic when it comes to stitching. Lots of ephemera and things in states of what looks like disrepair - a shabby chic effect overall. 

This particular book is organized around the seasons. She starts out with some basics on botanical dyes and paints (including how to forage responsibly), and shares tips on weaving and slow stitching. Then the book moves into chapters on Winter, Spring, Summer and Fall. There are 2 or 3 projects in each chapter, featuring varied techniques. 


From the aforementioned botanical dyes to cyanotypes, flower pressing, slow stitching, floral mandalas, or weaving with natural materials, each one takes a little bit of a different approach to creating nature based projects. Because you're using materials like this, a lot of the projects will be ephemeral ones. Although she does give advice on how to get the bugs out of the sticks or reeds you might want to use... 


There are some interesting ideas here, even if this book as a whole is a little too earth mother for my own aesthetic purposes. I liked the dyeing chapter, some new to me bits there, and the stitched blessing is a lovely touch, even if I would leave off the attached twigs and bits myself. 

You might find this a nice one to look through, especially if you enjoy bringing nature and all types of flora into your work. But if you're looking for anything sleek and modern, this won't do it for you. 


Sunday, March 9, 2025

Weekend Review: The Intentional Thread


The Intentional Thread / Susan Brandeis
Atglen, PA: Schiffer, c2019.
224 p. 

This is a wonderful book! If you want to learn how to use stitches like paint or pencils, this is the book for you. Brandeis covers many specific stitches, including machine stitching, but it's not just a collection of stitch guides. In fact it's not really that at all. 

This is a design book, where the stitches are shown in many variations, with many ideas how to create and use them in the service of composition and design principles. Not only does it show the stitch and its variations but there is also a "Try This!" addition to each one to help you learn and practice for yourself. 

Colour Wheel in stitch

There are tons of beautiful photos to teach and to inspire, and the book's design truly adds to its value. Brandeis talks about the basics like thread and base fabric choices - the colour wheel above is stitched on silk noil, and I love the texture of it. 

There are discussions of pictorial work, portraiture, abstracts, or my own favourite, text. I loved the text chapter, there were so many ideas on how to use your stitches to incorporate words into your pieces. Lots of different choices and variations on text, and I want to try them all. From strong visuals using one very readable word, to delicate asemic writing, she covers a range of concepts. 

This carries over to the other chapters as well. There is so much to explore in this book, it's one that you would be able to dip into over and over and keep trying new things. There is also a nice list of resources included at the end. Definitely one for you, if you have any desire to increase your stitching skills, your artful eye, or your ability to say something clearly in your artwork. I'll be looking for my own copy for sure. Highly recommended.


Friday, March 7, 2025

A Stitched Portrait

One more crafty item I have been working on recently is a stitching project inspired by an online class I took in January. TextileArtist.org is a group I often check out, even if I can't afford to join their actual Stitch Club. They have interesting features on textile artists from around the world, and once a year they often offer a free, short class as a teaser for their full educational program. This January it was Stitched Portraits with Susie Vickery. It was a fascinating class, and I really enjoyed it.


At the beginning of February I finally had time to try it out myself, and used a photo of my Mom to see how I could work out this process. It was harder than it looked! I followed the steps and gave it my best shot - for the first try ever it's not bad, although I can see a bunch of things about it that I would change on a second attempt. Mostly the length and density of stitches. I really enjoyed it though, and felt it was a great learning experience.


I would choose a less busy photo, as well, since I was editing as I was creating the pattern. It's recommended that the image is fairly small (6" max) so that it's not overwhelming, and I agree that it made it much easier to use a small pattern to try this out. As usual, I like bright colours so I chose a fun background from my stash and enjoyed this one. I will definitely try this again!


Sunday, January 26, 2025

Weekend Review: Sharp Notions


Sharp Notions / ed. by Marita Dachsel & Nancy Lee
Vancouver, BC: Arsenal Pulp Press, c2023.
352 p.

I'm not sure why I haven't reviewed this book before! I bought it when it was first released in late 2023, as it's obviously a book for me -- writers, textiles, Canadian. And I'm so glad I did. 

This is a collection of 27 essays about stitching, whether that is knitting, quilting, beading, crochet, or other textile work, by a variety of writers and artists. Some are very personal, going over a time in the writer's life where they faced loss or illness, or questions of belonging or identity. Some are more about stitching as a communal or professional experience. And they are all thoughtful and incorporate the ways in which stitching is embedded in the writer's experience of life. 

There are some writers included who I am already a fan of (including a former Literary Sewing Circle pick, Theresa Kishkan) and there are a few I hadn't heard of prior to reading this. I appreciated that this is a Canadian book and it features a wide ranging sample of writers beyond the usual white crafting circles. A diverse choice of authors is featured, all giving their own perspective on this theme. In some of the essays, particularly those by artists, colour images of their works are included, which is an added bonus. 

It's a literary collection, really focused on art and writing, and discussing how fibre arts play a role in the experiences they've chosen to highlight, in actuality and at some points as metaphor. It's one to read slowly, essay by essay, giving yourself time to absorb and think about the essays as you go. Lots to think about here. And it's extra appealing thanks to that beautiful cover, a work by Lia Pas, one of the authors included. If you're in the mood for some meditative, introspective reading, and you also stitch, this will most likely be a great choice for you. 


Sunday, September 8, 2024

Weekend Review: Hand-Stitched Oasis


Hand-Stitched Oasis / Theresa M. Lawson
Concord, CA: C&T, c2024.
128 p.

I recently found this newer book in my library, and I loved it. The author has an Instagram account where she shares a lot of work, and this book shows some of her secrets to her beautiful pieces. 

I found this to be well laid out, with lots of useful information and lots of great photos, both of the steps to the techniques she shares, and of some finished projects. The focus on the book is on sharing both how to create your own embroidery pattern from your own photos, and the stitches and techniques to use to get the realistic effects you're after. To this end there are only a few complete projects included at the end, if you want to try out her techniques without creating the pattern yourself - it's much more exciting to use her instructions on how to make a cherished image into a design! 

This is not an approach I've seen often, and the section on how to design something is quite complete, sharing all the steps from choosing a good image to altering it into a stitchable design, as well as how to choose background fabrics and good stitches to use for whichever effect you'd like. She talks about some of her designs to illustrate what she means, and I found a bunch of new ideas here. 

There are 35 techniques covered, from using varied base cloths, to painting the backgrounds to begin and then stitching on top, to using layered stitches to make new effects. There is a stitch guide included and I thought that was also clear and useful. 

I liked the style of her stitching; the varied stitches and open designs appeal to me. They feel quite natural, with variety in the number of strands she's using and a great eye for colour. The textures and colours really worked together well to create an artistic piece, in my opinion, and hopefully that's something you can pick up as you work on your own designs using her process. I had to return this as there was someone else interested in it as well, but I really wanted to keep it longer! I may have to buy myself a copy to work through all the steps and see what comes of it. I was impressed :) 

all photos via C&T Publishing


Tuesday, February 20, 2024

Mini quilt for a conference auction


Last year when I went to the SAQA Conference in my local area, I made a small quilt for the traditional conference auction. The Spotlight Auction features 6x8 textile art pieces which are auctioned off to benefit the organization. It's quite fun to see all the variations on a small artwork that show up during this display.

This year's conference is a virtual one, but the auction is still happening - it will just be 100% online. I decided I had time to make a small piece before the deadline. I started it last week but it's taken me over a week to finish, as I just couldn't decide on the design. I knew I wanted a labyrinth motif, but I started with an embroidered idea -- nope, didn't work -- then cut shapes out of two different fabrics, neither of which was just right. I finally found the right fabric, applied the motif, had a fusible glue accident that took an evening to fix, then had to decide what stitching to add, and found it needed a little something to finish it up. I have a pile of plastic florets that come off of sewing pins that wear out (yes, I save everything) and found that three white ones worked nicely as stars. 


It's finally finished! I'm calling it Night Walk, and it will be making its way to the SAQA auction shortly. It's nice to have a different kind of sewing challenge sometimes, to give you another sewing experience. I hope someone will end up liking this small piece enough to bid for it. I certainly enjoyed seeing it come together. 

Sunday, December 4, 2022

Weekend Review: Color, Thread & Free-Motion Quilting


Color, Thread & Free-Motion Quilting / Teri Lucas
Lafayette, CA: C&T, c2020
95 p.

I'm interested in learning more about art quilt techniques so sometimes I do pick up a few books to explore topics in this area. This is one I found via my library system; it looks at how using colour enhances a project. Instead of just quilting a project in invisible/matched thread, she examines how using color can be another design element in your quilt.

It's a fairly short book, but the instructional tone is clear and the book is well structured. She shares a colour wheel and talks about colour selection, but also includes lots of photos and examples. And, instead of relying on theory, there is also a large section in the book about making your own colour wheel samples, so you'll get practical experience with how colours work together. Using different colours of ground cloth, she suggests stitching up a bunch of colours (and weights) of thread to practice and see the results in actual stitching rather than just laying a thread across a fabric and trying to estimate the results you will get. I think this is very useful advice, and learning by doing is usually that way that works best for me. 

I also appreciated a section on thread types and weights, why and when you might use them, and the proper needles to use for each -- there's even a handy chart to help you out. 

What I found didn't work as well with this book was the 36 quilting designs mentioned on the cover. They are square samples at the back, hand drawn, and are all pretty standard designs that anyone who has looked into this area before will already be familiar with. So if you want to learn about colour and thread, there is a lot here, but if you are just looking for some new designs, try another title. 

I also found the stitching in the samples to be very basic -- maybe that's an encouragement to those new to the practice, though, as they are not glistening finished pieces. They are clearly sample works made as references and are not attempting to be anything else. They are simple unfinished pieces that set an example to perfectionists that you must learn by doing. The goal here isn't perfect stitching, it is in the use of colour and how threads play differently with ground cloth. And that is shown very clearly. 

Anyhow, if this is an area that you feel that you need to explore, this is a good title to check out. I learned some tips that were new to me and really appreciated the focus on hands-on exploration. 


Tuesday, October 4, 2022

Stitchalong: Poppy finisher!


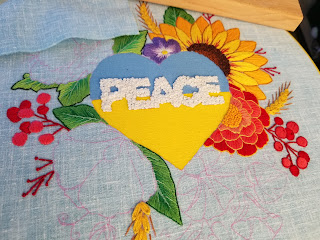
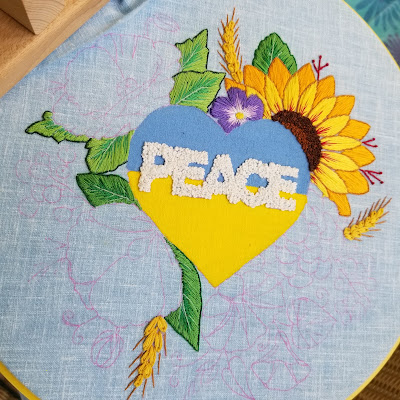
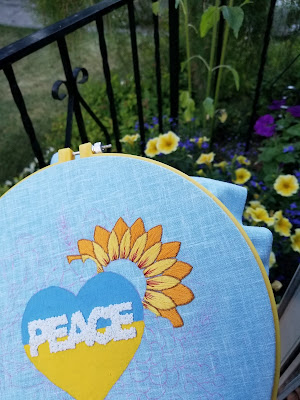
I did it! Finished my #PeaceForUkraineSAL, I mean :) 

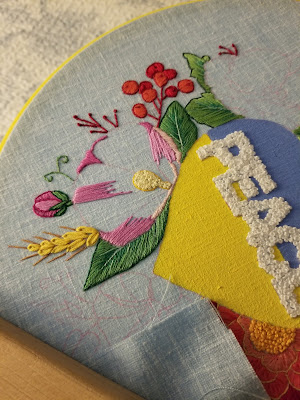
I didn't get much stitching or blogging done for last week -- had so much to do. But I worked extra hard on the poppy over the last few days so that I could finish up and share the completed stitchalong pattern. (Designed by Nat, a Ukrainian embroidery artist found at EmbroideryArtByNat )


I started this last motif rather slowly, beginning with the centre and the little bud. I then moved on to the split stitch outlining, which took forever -- I'm not great with split stitch. Forgot to take many in progress photos with this one, as I had it set up in the stand and was just taking a few stitches whenever I could fit them in - photos slipped my mind! 

The poppy is then mainly filled in with four tones of long and short stitch. I looked at a few finished ones by others and realized I liked the ones with the lightest colour just lightly applied. So I tried my best to balance it so that the darkest red was most in evidence. Again I wasn't sure about it halfway through, but once the darker shading was in it looked good. And when the black was added it all came together for me! 


I left the poppy until last because I was worried about being able to do all the shading. But after all the practice on the other motifs I think it turned out well. All that's left is taking it out of the hoop and finding a suitable frame for it. This one is going into a proper glass front frame; I'll share photos once I have finished that. 

I have really, really enjoyed stitching this piece. I've tried to listen to Ukrainian podcasts & audiobooks, sometimes music, while I was stitching so that it would feel like it was a learning experience in all ways. I really love the podcast UkrainianSpaces and recommend it. And I've been reviewing some of the books on my book blog, with more to come, if you're interested. 


There are many other great patterns by this designer, I encourage you to check her out on her website and/or Instagram. This pattern is still easily available on Nat's website along with many others, both images related to Ukraine and many other floral and nature designs, too. 

And please keep paying attention to what is happening in Ukraine, and help where you can. There are many local charities that need our help. 


Tuesday, September 20, 2022

Stitchalong: Purple Morning Glory


This week's progress on my Peace for Ukraine Stitchalong is getting me so close to the end! I worked on the little purple morning glory on the bottom of the design, which I really like -- the shading was tricky here but has such a wonderful effect. 


I started with the leafage, which was done differently from the other leaves in this design which I did in a batch earlier. These leaves are a bit rounder and 'juicier' so were stitched in double strand, and outlined in one strand. Then it was on to the interior stripes.


These were slightly tricky to add in, and I had to add more to the centre of the five point star shape afterward, as I hadn't brought them in closely enough together. But I really liked the colours and enjoyed figuring this element out.


After getting all the greenery done and fixing the central bits, I stitched up the little cone shaped bud and started in on the dark purple shading. It always looks odd at this stage but once you start filling it in it all comes together. 


You can see that the first layer is quite similar in tone but then it lightens up quite a bit in the middle, finishing with some white highlighting that just finishes it off beautifully.

I love the way the shapes and colours blend in this pattern, and am eager to work on the final element, the poppy. I've been leaving this one to last since there is so much delicate shading in it. I'm nervous about getting it right! Thankfully I've had some practice now with the other flowers. 

It will soon be time for some framing decisions!


Just a reminder that this project is a fundraiser for Ukraine. There is still a war going on and they need our support more than ever. You can find this pattern on the website Embroidery Art by Nat, as well as suggestions of many ways to assist Ukraine. I would personally recommend UA24 or Come Back Alive as reputable places to donate (among many others) if you would like to give money directly to Ukrainian charities.

Tuesday, September 13, 2022

Stitchalong: Pink Mallow


Today's element of the #PeaceForUkraineSAL is the pink mallow flower. It's a big bloom, and adds some shiny pinks to the mix. There are quite a few different bits to this one: from the little bud done in satin stitch to the central stamen in french knots to the 3 layer long-and-short stitch that makes up the flower itself. And then all the outlines and little details. 

But somehow this one didn't feel like it took that long to me. I really enjoyed the repetitive nature of the stitching that makes up the flower. Like always, when you're at the first layer of stitching it doesn't look like much. But as you add in the colours and the petals fill up it starts to look really great. 


I probably could have extended the medium pink a bit further out into the petals, but I am happy with how this turned out. I like the mix of colours and think that the little details like the central cream and green streaks around the stamen add so much. The pale pink split stitch outline on the petals really makes it pop as well. I think it has a sense of a cupped flower with those details. 

I've really been following along with the pattern and not deviating much, and I enjoy the design and all the thoughtfulness put into the smallest bits to make them just so. All of the shading really makes the design, to my eye. Among the traceable patterns in the instructions there is also one with directional guide lines drawn in, and I've been using that one for this week's and last week's work in particular. To make the petal edges look distinct, it's useful to change the direction of your stitches, and seeing them sketched out in the pattern is so helpful. It saves time when someone else has already thought about and worked out the best placement for the effect you want! 


This flower is really lovely and I'm very impressed with the finished look. I wasn't fully sure I liked the pinks when I started but I love the finished bloom. Only two more flowers and then I will be done this project. But there's no limit on the support we can give to Ukraine. Victory to Ukraine!


Tuesday, September 6, 2022

Stitchalong: Oh the Red Kalyna!

This week I finished up the two sprays of kalyna berries on my #PeaceForUkraineSAL project. As always, you can find this design on Embroidery Art by Nat's website.

This element may look simple but it wasn't; it took longer than some of the larger elements! This is because the berries are all done in padded satin stitch. So, to make them you're basically stitching them twice.

I outlined each one in one-strand split stitch, then filled in the berry with rough long split stitches. I made the pad stitches at a 90° angle to the direction I wanted the final stitches to lie, since there will be better coverage if the stitches are sitting opposite - no creeping between as might happen if they were all lying the same way. 

Anyhow, after all that split stitching came the second layer of satin stitch in two strands. Each berry was finished and then outlined in stem stitch, and I added a french knot to each to give them that berry look. Most were fine but a couple of the knots slid down between two stitches so I added another one on top in that case. I just keep fiddling until it looks about right ;)

The stems were a nice quick whipped back stitch and I'm glad part of these two sprays was easy since I found this element very fiddly indeed! But I love the finished look and the pad stitching really does make them pop off the backing nicely. Next up, I'll be working on the pink mallow flower at the bottom of the design.

The instructions give a little bit of the history, legend and/or meanings behind each of the elements, and I think people may be familiar with the Kalyna (or viburnum) now that the folk song Chervona Kalyna seems to be everywhere. Today I'm sharing my favourite version: 


Tuesday, August 30, 2022

Marigold on my Stitchalong


More updates on my #PeaceForUkraineSAL project! This week's element is this cheery bright marigold. It has french knots, satin stitch and split stitch outlines. Once again there is some shading of a deeper colour in the centre of the petals, though it's quite subtle here. I love the effect of it each time it's used. 


There are three bands of colour, all kind of rosy coral pinks. After satin stitching the petals, they are all outlined using single strand split stitch. I find split stitch a bit wobbly but when I switch to split backstitch I get neater stitches and better curved lines. Either one is fine, I just find backstitch easier! (what's the difference between them? Great explanation at Needle N Thread)

The inner petals are done in the lighter yellow of the wheat stalks but when I got to the outer rings and the darker pink, I decided to switch to the slightly darker yellow that I used for the french knots in the centre of the marigold. I like the definition this gives, and it also makes the back layer of petals recede a little visually, which I feel has a bit more of a 3D effect. 


This element was actually pretty easy to complete, as it was mainly a lot of satin stitch, which I find quite easy to do. My french knots are getting better with all this practice too! Don't forget that this pattern can be found at the designer's website, Embroidery Art by Nat, and is a Ukraine fundraiser. You can find so many of her other beautiful designs there as well! 


Tuesday, August 23, 2022

Stitching All the Leafage


Really happy with how my #PeaceForUkraineSAL is progressing -- this is pretty fast for me ;) I finished up the wheat stalks from last week and moved right into the first leaf at the top of the design. it's done in a long and short stitch with some contrast for the veins and the shading in the middle, as well as an outline. I was quite pleased with the look of it and so moved right on to the Guelder Rose leafage at the bottom of the design.


That worked even better, now that I had practiced the technique on the first one! I really like how smooth and shiny these ones turned out. The edges were also much smoother than the first leaf so it was easier to get a sharp outline. Next up were the poppy leaves to the left.


These one are done in a lighter green, with a darker outline. I like the effect quite a lot, and find that the greenery all together adds some life and brightness to the design. I love the design of this project, there is so much smooth, full coverage stitching and it's really pretty. Can't wait to add some reds and pinks in next. 


If you're interested in giving this one a go as well, just a reminder that the designer is Embroidery Art by Nat and that this one is a fundraiser for Ukraine, with all the info on her website. You can now also buy the pattern directly on her Etsy shop if you wish, as well.

Tuesday, August 9, 2022

Full Sunflower stitched up!

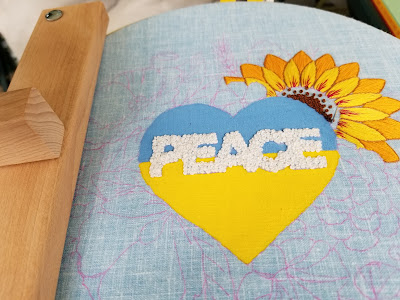
This week I am glad to be able to share a completed motif -- I've got the sunflower all stitched up, with the central arc of french knots all done. It was really well planned, with the inner circle a lighter brown and then filled in with dark brown. It gives such a nice variegated effect.

I enjoyed this bit; I think my French knot technique is improving with all this practice. I did do a quick refresh by watching the stitchlong video on the designer's youtube channel again. And it stitched up so quickly that I also put in the little red sprigs behind the flower to complete the motif.

You might also notice something new in these photos -- yes, I feel legit now that I've got an embroidery stand! I bought this little stand for $10 at a church sale just prior to the pandemic but had never taken it out of the box. My husband kindly noticed that I was starting this big project and went and found it, and put it all together for me. It was all still in the shrink wrap packaging, so brand new and VERY useful. I don't know how I worked without it!

In any case, I'm zipping along (by my standards) on this project and am heading to the little purple periwinkle next. I'm getting more invested in seeing this all done up. And it will be nice to work in a different colour next!


Tuesday, August 2, 2022

Sunflowers for the Stitchalong

This week's stitching on my Peace for Ukraine project is the sunflower - that's where I started in on the florals. It's really lovely; two layers of petals in two tones of yellow, with an outline stitch, and some details in the base of the petals. 

The petals are all done in satin stitch. I started out on the inner petals, carefully filling them in the way that Natalie shows in her stitchalong video. But as I went along I realized I could save a little thread by switching to a stitch I've seen called "Mexican Satin Stitch" (not sure why). Instead of moving your needle up and down across the space you're filling, which essentially gives you full coverage front and back, the adapted stitch has your needle going from top to bottom, then up again right beside where you just went down, and so on. This means the front looks like satin stitch, and the back is a series of little discrete stitches. Much less thread. 


Using this stitch necessitates careful placement of your needle, though, as you don't want gaps in the satin stitch coverage. I found it worked well with this project, and finished up my petals this way. I did find that my coverage on the sides of the petals wasn't as complete as the pattern was; I should have added a few more small stitches to round out each petal. But I think it's good enough and looks great once the outline stitches and the shading details have been added. I really love it!

Next up: more french knots!! What else could you possibly use to fill in the centre of a sunflower. More chance to practice my technique I guess ;)