Thursday, June 29, 2023

Whittling away at the Mending Pile!

During MeMadeMay this year, one of my goals was to work on the pile of mending in my sewing room and decide whether to fix and wear or give away all the items languishing there. I got a few pieces done during May, and have been able to get a couple more back into the wardrobe this month. 


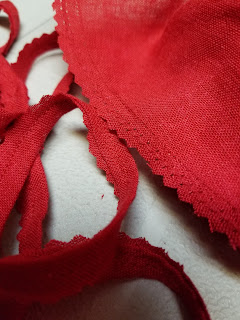
I made a quick repair of a red linen blouse -- the Ruffle Sleeve Top by In the Folds for Peppermint Magazine. This has been in the mending stack for a while, and yet the mending only took about 15 minutes. I had a small hole on the seam of the interior facing to stitch up, to start. And I had finished the edges of the facing by turning under and stitching, but with this very lightweight linen, I didn't like it -- it added bulk across the edge of the facing that could be seen as a line from the outside. 

So I made a line of straight stitch about 1/2" above the original edge, added a line of narrow zigzag just beside it, and trimmed off the original clunky hem with my pinking shears. I figure that one of those will keep it from fraying! And now it looks so much better that I've already worn it this week. 

The second project was another thing I've been putting off because it felt like so much work...but it really wasn't much! I made this rayon Burda in 2021 but after a few wears I felt that the elastic waist casing was starting to go.

It was still wearable but didn't feel too reliable. This pattern used the technique where you stitch together the seam allowances of the waist seam and use that for the casing, but with a lightweight rayon like this I find that unless you have a large seam allowance it starts to fray and pull out. So I trimmed the fraying edge, pressed the remaining seam allowance flat, and stitched a wide bias binding strip over the waistline seam. 

I then threaded elastic back in to the new casing and stitched the hole closed. Now it feels secure and sits nicely at the waist, and I won't have to worry about the elastic popping out anytime soon! 

I have a couple more blouse hems and sleeves to work on, as well as a few skirts. They are all minor fixes but are all necessary to make the items wearable again. I hope to keep working away at the pile and catch up through the summer. We'll see how it goes! 

Tuesday, June 27, 2023

Cover Designs! #31: In Honor


Cover Designs is a feature in which I try to match up the outfit on a book cover with a dress pattern and sometimes even potential fabric matches as well. Today's pick is a YA novel that would be a good summer read -- it's by Jessi Kirby, titled In Honor. 

Summary from the Publisher:

Honor receives her brother’s last letter from Iraq three days after learning that he died, and opens it the day his fellow Marines lay the flag over his casket. Its contents are a complete shock: concert tickets to see Kyra Kelly, her favorite pop star and Finn’s celebrity crush. In his letter, he jokingly charged Honor with the task of telling Kyra Kelly that he was in love with her.

Grief-stricken and determined to grant Finn’s last request, she rushes to leave immediately. But she only gets as far as the driveway before running into Rusty, Finn’s best friend since third grade and his polar opposite. She hasn’t seen him in ages, thanks to a falling out between the two guys, but Rusty is much the same as Honor remembers him: arrogant, stubborn . . . and ruggedly good-looking. Neither one is what the other would ever look for in a road trip partner, but the two of them set off together, on a voyage that makes sense only because it doesn’t. Along the way, they find small and sometimes surprising ways to ease their shared loss and honor Finn--but when shocking truths are revealed at the end of the road, will either of them be able to cope with the consequences?


This is a funky summer outfit, and there are two dresses that spring to mind, although I'm sure there are plenty of patterns in this style out there. 

The first choice would be the Sew Over It Rosie Dress (on sale today only, too). This has the perfect shape for a knock-off of this cover, including the cute accent at the neckline. 


A fabric like this might give a close match! 

Viscose Abstract Dot from Fabricville

If you wanted to highlight the tinge of red in the cover dress a little more forcefully, this bright print would make a great summer dress, too.

Art Deco Petals from FabricsGalore


The next option might be a vintage reprint. McCalls 7599, View A (leaving out the petticoat) would give a very similar result to this cover image. 


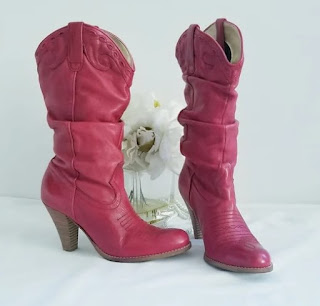
And of course to top off this look, you'd need to find some slouchy red cowboy boots! These Jessica Simpson boots at Poshmark were the closest version I could find, but red velvety ones would give an even closer match! 


Whatever you wear in the sunshine this summer, I hope you enjoy it - and all your summer reading too.


Sunday, June 25, 2023

Weekend Review: The Missing Pieces of Nancy Moon


The Missing Pieces of Nancy Moon / Sarah Steele
London: Headline, c2020.
416 p.

This is a typical kind of British family saga, in that there are multiple generations involved, family secrets, and a young woman at the heart of it all. But it's also particularly fascinating since it includes two women who are fashion sewists, lots of talk of dresses, fabrics and vintage sewing -- the structure of the book depends on it. 

As the book begins, Flo is at her grandmother's funeral. She was mostly raised by her gentle grandparents, so this is particularly wrenching for her. Also, her marriage is cracking up due to a miscarriage she had in the last year. All the sorrow is getting to be too much for her. 

She decides to stay at her grandmother's house after the funeral for some alone time, and wandering about, looking for an old sewing machine she knows must be there somewhere (Flo is one of the sewists in the book) she stumbles across a box of vintage patterns in her grandmother's bedroom closet. Flo has never seen it before, and as she opens it, she discovers a seamstress named Nancy - who is unknown to her. 

Nancy is from her grandmother's generation; the reader certainly knows a lot more about Nancy Moon than Flo does. It's a long trek for her to find out more, and that is what the book is all about. Flo's husband goes to American for a teaching gig, leaving her at loose ends; with the encouragement of her friend Jem, she decides to travel across Europe, following Nancy's path as much as she can from what she can decipher from the sewing patterns, which have postcards, ticket stubs and fabric tucked into the envelopes. She also decides she is going to duplicate the dresses that Nancy made so that she can wear them on her trip. 

While we don't see or hear much about Flo's process of making the dresses (pretty quickly I'd say) we do follow her to Paris, and then to Venice and beyond, as she tries to replicate Nancy's movements and research where and what and why. Each section, based on a location, moves back and forth between Flo's era and Nancy's, and we get to engage with both of them and their varied experience in different decades. It's also interesting to read it this way, as the reader can follow Flo's investigations and see whether she's on the right track or not. 

I enjoyed the descriptions of the dresses that open some of the chapters, and the discussion of style and fabrics and individuals who are highlighted because of the statements they make with their wardrobe choices. The author has included a gallery on her website that shows all the vintage covers of the patterns she discusses in the book, if you want a good look at the outfits that both Nancy and Flo are making. 

There a few moments in this book in which coincidences strain credulity, but overall it was an engaging read with some good character development. And the settings are also quite lovely to read about! If you like books about family secrets and sewing, I'd definitely recommend you give this one a try. 

Wednesday, June 21, 2023

When Refashions Go Wrong

Way back in the spring, PatternReview was running its Sewing Bee challenge. I made it to Round 2 on the strength of my first project, a Knit Dress With A Twist. 

The challenge for Round 2 was Collars. I have lots of collars that are interesting, and lots of things I've always wanted to try. I decided to try to make a Book Dress with a Chelsea Collar that would be multi-layered to look like book pages. Well, great idea but not so great in the execution. 

I used Simplicity 7238, a Christie Brinkley pattern from 1991. I had some good base fabric for the dress -- an old sheet, which had tones and shapes that reminded me of old book bindings. So far so good. Then I tried to create layers of sheers as "pages". So many problems! 

First off, the Chelsea collar wasn't the right choice for this concept - there was too much collar, and the sheers that I had in my stash just weren't stiff enough. I sprayed them all with spray starch and pressed but still not enough body to have the effect I wanted. Also, I caught Covid right at the beginning of collar week so was way too exhausted to do anything that might have added to the effect, like adding a text underlay, stitching with wire edges etc. I gave up and just got done what I had started so I had an entry. 

But I didn't like very much, I felt that it really didn't work for me. I put it aside thinking that maybe I could take off the sheer layers and make the dress actually wearable. I finally got to the refashion this month, and removed the sheer bits, sewing the plain collar back on. I like it much better, and think it could be wearable. But not, alas, by me. 

I don't like the shape of this dress, or the collar, or the fabric colours (why did I think I would like these colours on me?). It doesn't have any drape, and the whole outfit is just a big fail, refashion or not! 


However, the fabric is very interesting in its own right, so I'll be unpicking the zip to go back in the stash, and cutting up the dress to put into my art quilt scrap box. I can see it making a great background for something :) The joys of having non-garment sewing possibilities! 

This project was another reminder that the things I make for challenges or contests that don't already fit in with my wardrobe plans and/or colour-pattern preferences are rarely successful. I will be able to reuse this fabric, but will never get all the time back that I sunk into the project. Have you had projects like this too? I have to remind myself to be more conscious about what I'm choosing to make, in many different ways. 


Sunday, June 18, 2023

Weekend Review: Stitch Your Story


Stitch Your Story / Sarah Fielke
Louisville, CO: Lucky Spool, c2019.
144 p.

This is the most recent publication in my recent string of alphabet quilting guides, and I think it has squeaked into top position as my favourite of the three. This is mostly because there is more in it than just paper piecing/improv piecing -- both of which were the focus of previous reads, but there are a couple of techniques that are more likely for me to actually do in this book.


I enjoyed the variety in this book. It's a little longer than the others, and has some interesting projects included. The first three sections are based on gridwork; the letters are put together in squares, half-square triangles, and a couple of other more angular blocks too, depending on the letter and style. It's an interesting way to think of creating text, and the three options show how different the choices are using much the same technique. Section 5 is kind of a follow-on to these options, being an improv piecing technique that is freer than the grids but gives a similar effect.

Section 4 discusses needle-turn applique, which allows you to have more rounded letters and a cursive effect. It's definitely something that interests me, but I think you have to like applique to use this more than for just a few letters! I'm not so great at it but perhaps could improve with practice. But the best idea, for me anyhow, was the use of bias tape to make a cursive word across a background. She suggests prepared fusible bias tape for the easiest use, but of course you can also make your own and stick it down yourself. 

I really like this style of lettering. Because it's bias, it's flexible and able to be arranged into flowing shapes. In the section featuring bias, the instructions are clear, with diagrams, to show you the best places to fold, overlap, or otherwise shape your letters in bias tape. You can use purchased bias tape or of course use your own in any print or colour you want. I have varied sizes of bias tape makers so could easily give this one a go. Since I love handwriting and cursive, this technique jumps out at me as something I'd really like to try out.


All of the sections are clear in their instructions, and the photos in this book are bright and detailed. Plus there are diagrams and patterns so that you can incorporate these styles of lettering into your quilting easily. I also liked many of the projects in this book. They are not all simply lettering as the main or only element; there are beautiful backgrounds with lettering as one element that blends in nicely, as with the bias tape pillow. There is also some discussion of what words you might want to use and why -- a little bit about the concepts behind a project, which was interesting to think about as well. 

If you're interested in these techniques and ideas, you can check out this book too, it's really good. Or, you can take Sarah Fielke's "Word Play" course on Craftsy, or her Improv Lettering class right on her website. I can see so many ways to add lettering to projects! 


Thursday, June 15, 2023

Stash Reshuffled

At the last meeting of my local Garment Guild before the summer break we had a pattern & fabric swap. This necessitated a rummage through my pattern stash to see what I could weed out!

Sorting...

As it turns out, there were only 34 I was willing to part with at the moment 😉


I did get a good look at everything again, however, which is always useful. And it also reminded me that I didn't really need to pick up many more at the swap. But it didn't mean I completely held back! 


I picked up a small piece of striped knit, some lining, & a few patterns. The Folkwear ones were given to me directly by another member of the Guild who knows about my Vyshyvanka project. How thoughtful! I hope to use some of these before too long.

It's great to be able to share sewing supplies with other enthusiasts who you know will enjoy them. Swaps are a great time!


Sunday, June 11, 2023

Weekend Review: Word Play Quilts


Word Play Quilts / Tonya Ricucci
Bothell, WA : That Patchwork Place, c2010.
64 p.


If you want to piece text into your quilts but are intimidated by paper piecing, this improv piecing style might be just the thing for you. This is a short book, all focused on how to piece letters with improv techniques in order to create "Word Play Quilts". The author uses a lot of her own projects throughout to provide examples of how the techniques work together and the way they look in a finished quilt. Most of her work is heavily text-centric; there is more text than imagery, and the concept is very important. 

If this is your thing, you'd love this book. There is a chart included at the end to show you the order of piecing for each letter so if you're not comfortable free-styling there is still a way into this technique for you. Also, there is a fair bit of instruction on how to choose and blend fabrics to maintain readability (scale, print, colour tone etc) and discussion of reasons to choose text. There are tons of photos of projects but also clear steps and lots of instructional diagrams. And there's discussion of technicalities like managing curves and deciding on size and spacing to make sure your letters work together as words. 

It's not really an 'inspiration' book as much as a workbook of sorts. I don't think this is one I'd leaf through and expect to retain a lot of the detailed instruction. However, as a guide to actually piecing letters, I think it would be fabulous to follow along with as you are actually making your text. It's a practical guide aimed at how to make fabric text, and as such, it really does what it sets out to do. I'd highly recommend it if you want to learn this style of piecing in order to add text to your projects, whether that's a quilt or the back of a jacket ;) 

Thursday, June 8, 2023

Liesl & Co. Santa Rosa


My latest project is one that I made as part of the Liesl & Co. Advisors Circle. You can see my full post about it over at their blog now! 


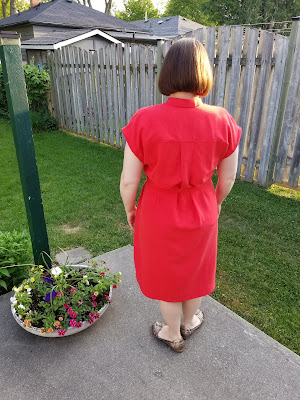
A few notes about it here for my readers, though. I combined the top and dress views for my outfit; I cut the dress length but used the cap sleeve of the top view. I also decided not to include the breast pockets from the top view. Instead, I added some side seam pockets, marking the waistline when cutting it out so that I could place the pockets correctly. To add these, I just used my favorite pocket template that I keep pinned up in my sewing room.

I made a couple of minor changes aside from these - I graded from 10 at the neckline to 14 at the hip, adding a tiny bit more across the hip area. I also changed the self-tying sash to a narrower D-Ring belt as I was using bronze toned buttons and had matching bronze D-Rings in the stash and thought it would look nice together! 

I can see switching the box pleat at the back yoke to an inverted pleat for another option, if you wanted the back to be less poofy at that point. Because I'm using a fabric with nice drape, it works very well, although I will always wear this with a belt, as the design intends. My height and shape means that the back is too voluminous for me without a belt. If I was a bit taller or the dress a bit shorter, it could be carried off loose, I think! 

In any case, I love this fabric and was so pleased to match it up with this pattern. It works really well, and is light and comfortable to wear. I was a bit worried when I started that the colour was a bit too orangey for me, but when it was all done it actually worked well and is more red than orangey against my skin so it works! It's a nice pattern with a very interesting placket construction so I'm keeping this one in the rota for potential duplicate makes. 


Tuesday, June 6, 2023

In A Tracing Frenzy!

This week is all about pattern prep for me! I have a ton of patterns that I've purchased in the past that I have not made up yet. PatternReview is running a two-month challenge to make up some of those stashed patterns using stash fabric. Since this is the way I sew quite frequently, I took a look at what I had in the queue. The only caveat for this contest is that patterns & fabric must be prior to 2023, and the patterns can't be repeats or even ones you've already prepped for making. I decided to try a few of my Indie patterns for this challenge, although I have numerous big four envelope patterns that I could use as well ;)

First up is the Zoe Dress by Simple Sew, it's a casual shift I've been planning on making for this summer so it fits right in! I also have a purply-magenta linen a friend gave me last year that I'm matching up with this one. 


And I bought the Wiksten Shift Dress/Top late last year when it was announced that Wiksten was closing. I put off buying for a very long time during its peak popularity, but impulse bought it once it was going away. So that matches the contest rules as well - I have that ready to trace, and I have a couple of different fabrics in my deep stash that might work, I haven't chosen which one to go with yet. 


I am also going to make the Afternoon Blouse & Shift Dress by Jennifer Lauren, another one I've been meaning to make for AGES. I bought this pattern sometime pre-pandemic and it has been on the queue ever since. Once I get it traced out, I'm planning to make the blouse view in a bright grassy green linen blend? cotton blend? well, mystery fabric I got from a friend last fall when she was cleaning out her mother's stash. A dress will follow but I don't know which fabric I'll use yet. 


And I think I will also trace out the Fresco Blouse by Studio Calicot in this round of tracing. This is a pattern that is on my Make Nine for this year, and it's such a cute one. I might use a black rayon or a multicoloured silky poly for this, haven't made up my mind yet. Both are pieces I thrifted in early 2022.


I was also going to make the Antonia Dress by Pattern Division for this contest (also on my Make Nine) but imagine my surprise when I opened my envelope to discover that at some point I had already traced and fitted the pattern pieces, but never actually made one! So this won't fit into the PR Contes rules, but I am still making one for my summer wear. It's such a neat pattern. 


I think it's clear that I'm into shift dresses for this summer! Hoping for some comfy summer wear in lovely fabrics. Are you planning new items for your summer wardrobe this year?

Sunday, June 4, 2023

Weekend Review: Quilt Talk


Quilt Talk / Sam Hunter
Lafayette, CA: Stash Books, c2014.
144 p.

As many of you already know, I am a sewist but also a librarian. I love seeing sewn text! Lately I've come across a rash of books on adding text to quilts, using varied techniques. This is the first one I'll share this month. 

I picked this up thanks to my library, and have been really entertained by it! It includes 12 projects, but the projects are not all full quilts; as shown on the cover, she has small projects with just a few letters so you can get started without too high a level of intimdation! 

This book is focused on paper piecing - there is a big section at the end with all the patterns to copy for all the letters. The book opens with a guide to paper piecing, if you've never done it before this will be particularly useful. You sew bits of fabric onto your paper foundation backwards to get the letter shape -- I've never done paper piecing and must admit that the process looks quite complicated to me, even though she's created a process that doesn't require specialized tools. There are also a couple of charts full of math and measurements in order for you to size the letters up and down, and adjust the kerning as needed (the spacing between letters & words). There is a full alphabet included, both upper and lower case, plus accents, and a row of special characters you might be most likely to need. If you're into this kind of text making this book will be a great resource.

It's a bright and cheery book, with many of the colour choices bright and modern. The photography is clear and plentiful, so that it's fun just to look through this book for inspiration. There are a variety of projects and each one has the instructions for the lettering, but also how to make the project itself (like the little bucket bags on the cover). Projects range from baby quilts to full size quilts, from wallhangings to house decor. So you could do any project as is, or just use the lettering guide, or even just the bigger project without lettering. Lots of options here. You can find out more about it on the author's website if you're interested, and of course could get a copy at your local library to check out the techniques if you're also wondering about the possibilities of sewn text. 


Friday, June 2, 2023

Stepping Stones: an art quilt


One of my other sewing hobbies is making art quilts, although I really am a beginner in this area. However, I mentioned last month that I'd started a little 12x12 quilt based on the materials I picked up at the SAQA Conference in Toronto. 

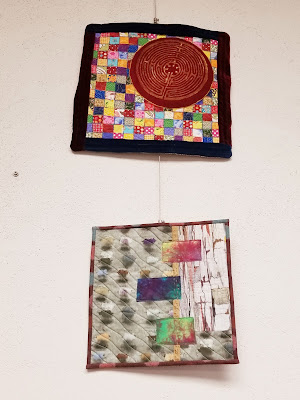
And I've finished it! Finished and hung within a month, it's a record for me ;) I wanted to get this done to hang it up in the staff art exhibit at my library, which I've called The Creative Library. I manage the art program so when there was a gap in the schedule I knew it would the perfect time to highlight the many creative coworkers that I have. There are photographs, digital collages, old-school collage, paintings, cross-stitch, and my textile pieces - so far! 

I am really pleased with this little piece, which I'm calling Stepping Stones. It was made with fabric picked up at the Community Stitch table at the Pathways to Possibilities conference, and it looks rather stepping stone-like. Also it's another stepping stone in my learning journey. I put the fabrics together fairly quickly, and added some embellishment, but I was a bit stuck on how to finish it. After looking up varied techniques, I decided to create a binding with butted ends (I can't get the hang of neat mitreing). I used this tutorial almost exactly. I think that it worked very well, and would definitely use this style of binding again on a small quilt.


I used my own fabric for the binding and the backing, but everything else was from the community table.

Backing with a split sleeve and a little hook 
to hang it as well (a pop tab)

 I really enjoyed how this worked out, and it's now up on the wall to share with my own community! And to balance it all out, I hung one of my older small pieces above it. Nice to have them out for viewing.