Tuesday, May 12, 2020

Cover Designs #16: The Great Pretenders


Cover Designs is a feature in which I try to match up the outfit on a book cover with a dress pattern and sometimes even potential fabric matches as well.


Today's book is The Great Pretenders by Laura Kalpakian. Set in the 50s, it follows the life of Roxanne Granville, the daughter of a Hollywood producer who wants to make it on her own. From selling a script by a blacklisted author, to falling in love with a handsome African American journalist, Roxanne never shies away from controversy. If you're looking for a book full of Hollywood glamour and some more thought provoking content as well, this might be the summer read for you. 

Now on to the cover. Yellow seems to be the colour of the year, and this beautiful halter dress is right on trend. I would immediately go to View A of Butterick 5209, a vintage reissue, to copy this look. Even the pattern thinks that a wide brimmed hat is the perfect accessory for this dress.
Of course, to really carry this off you'd have to add a self-belt to the halter dress, perhaps with a belt kit like this one. And if you thought you could get away with it, maybe add some long gloves!  

To get the flow of this cover dress, a lightweight cotton voile or a more shimmery polished cotton might do the trick. Layers of cotton organdy might give the skirt a full effect like this one as well. 


This cotton lawn from Mood, in layers or lined, might give just the right lightness to this dress. And it seems like it's just about the right colour, too. 

If you want to go a little more natural or earthy, try this Essex linen cotton blend from FabricSpark. Drapy enough for garment sewing, it might give a little body to this dress -- lining essential for the bodice, though! 


Enjoy some bright summery sewing along with your summer reading!

Sunday, May 10, 2020

Weekend Review: Tucks Textures & Pleats


Tucks Textures & Pleats / Jennie Rayment
Haslemere, Surrey: JR Publications, c1994.
104 p.

Today's book of embellishment ideas comes from Jennie Rayment, a quilter known for her fabric manipulation techniques. This is one of her very first books, and I first became acquainted with it through my local quilt club. 

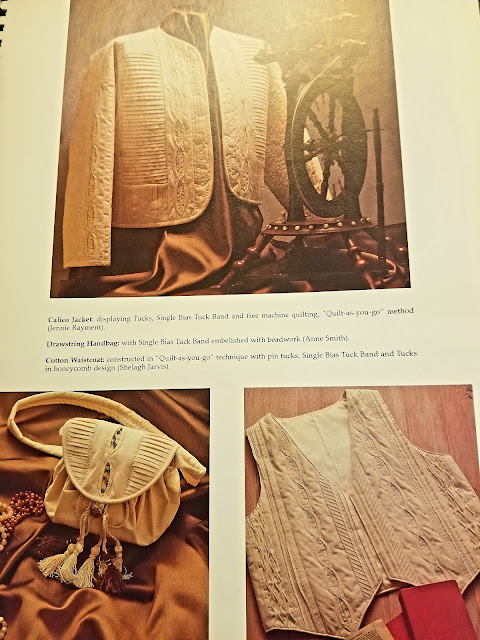
Although it is aimed mainly at quilting and/or decor objects, there are also project ideas for adding fancy panels to bags, belts or even jackets and vests. The book is arranged both by technique and project -- since it was self-published, the instructional illustrations are all just hand drawn black and white, but they are very clear, and the techniques are clearly explained. There are a couple of colour photo pages inserted as well, showing some of the finished pieces in greater detail. 


There is also a section on what to do with your textured pieces - create cushions, bags and so forth, and how to finish them neatly. Lots of ideas and examples to spark the imagination and get you going on a new fabric manipulation kick! 

Of course, since I'm looking at this book from the perspective of garment sewing, I could see many ways to adapt these techniques to a piece of clothing. Creating special panels for a quilted style jacket, perhaps. Or maybe a yoke or insert in a plain linen dress that has some fancy pintucks beforehand (I like the look of crossed tucks a lot). There are ideas for creating texture through quilting, or through origami style folded fabric that is stitched into place. She even has new ways of using bias tucks or bands as accents. And there is a chapter on fabric weaving. There is a lot here that a garment sewist can be inspired by! 


It's funny that this book is quite old but the techniques feel fresh and intriguing. The author's website has a bit more information as well as a follow-up book to this one available, so if the idea of changing your fabric through texture appeals to you, I'd recommend you check it out. For an older coil bound quilting focused book, I was surprised by how much use I could get out of it for clothing and accessory projects. I like her approach to teaching and writing, and think that she has a gift for inspiring even newer sewists and needleworkers to give some of these ideas a try. Recommended!


Friday, May 8, 2020

Style Arc Lacey Dress, Take Two


I first made the Style Arc Lacey Dress in 2018, in green seersucker. It was a heavier fabric so I ended up changing the Lacey's gathered skirt to a pleated one. This time, I am using a vintage rayon, very soft and drapey, so stuck with the original design. 

It's kind of nice making a pattern for the second time: most of the adjustments have already been made! I often write all the changes I've made, when I'm first trying a pattern, onto an index card and slip it into the pattern envelope. It's very handy to see what I might have done that I haven't marked permanently onto the pattern pieces.


I was glad I had noted that the Lacey needed to be taken in by an inch at centre front and back -- I often do this for many patterns as it is a quick way to narrow my shoulder/chest area. I shift the pattern 1/2" off the fold at the neck and angle it so that the wedge is a few inches long. This isn't exactly kosher patternmaking/altering but it always works for me. 

In any case, I was very happy to finally get to this project, which I've had in mind since last summer. This fabric was given to me a couple of years ago by a friend's mother -- it's quite old rayon and had some frayed holes along one edge of the selvage. Fortunately I was easily able to cut around the holes and get this amazing striped fabric to shine to full advantage in this pattern, which really highlights a good stripe. 


I switched the pocket bags to my default pocket, as the drafted one is teeny. Because this fabric is so soft and drapy, I was able to avoid having to make any other size alterations. The Lacey is an easy make, no closures and a loose fit that looks good and will be very cool in the summer. But it's not too loose, so I don't feel sloppy in it. 

I love the way this vibrant fabric looks with alternating stripe directions and a gathered skirt. It's a straightforward design, with minimal Style Arc directions, but then it isn't very difficult at all. The bodice design is clever and goes together quite nicely, with the front and back shoulder/sleeve all in one piece. 


This Lacey dress gets a thumbs up from me -- I have a feeling I will be wearing it a lot this summer. This is one of my planned May projects done; two others are cut. I am feeling much more like sewing lately!


Tuesday, May 5, 2020

Getting Organized: a needle tracker


I have had this idea on my mind for quite a while but finally got around to making it this week. PatternReview is having a month of mini contests in May & this week is sewing room accessories. It gave me the push I needed !I always find that keeping track of my needles and which I am currently using or have used but it is still good for another project -- all that -- confuses me. So when I first saw this project online I thought it was next to brilliant. 

This is actually a fairly easy project, based on this genius tutorial by Portia Lawrie at the Makery. I changed it just a bit. 

For my version I used a fat quarter of Japanese cotton as my backing, just folding it in half to get the size I wanted ( the fatter rather than skinny fold). I fused on some medium weight interfacing to one half of it to give it a bit more body, and then stitched around the outer edges and turned it right side out. After pressing it again I topstitched the edges, closing up the turning gap that way.


I cut 4 strips of cream felt at 1.5" to make the needle pockets, dividing them into 4 sections with stitching. I added one 1.75" strip of grey felt at the bottom and made 3 pockets in it. 

The grey section is for the packet that I am currently using, and since I have 3 machines I made 3 pockets. I am going to add an initial to each one to help differentiate between my Janome, Kenmore, & Featherweight.


The cream pockets are for all the needle packets that I have or am likely to use soon. As I use one, the little container goes down into the grey section, and when I am done, the container goes back up into a cream storage pocket and if the needle is still usable it gets stuck into the front of the appropriate needle pocket for later use.


I think this system will help me keep much better track of my machine needles without having to resort to a magnifying glass to see the marks on a needle.

Do you have a good system for this? I have always found organization difficult so am glad to find something that feels easy to manage!


Sunday, May 3, 2020

Weekend Review: Embellishments A-Z


If you are currently one of the many people staying home, and finding more time for sewing, maybe you're starting to think about projects that take a little more time or effort. If so, I have some ideas for extra details and embellishments that you might be interested in exploring, all found on my bookshelf.

I do have quite a few sewing and textile art books in my collection, and this month I will share some of the interesting ideas from these books. Maybe I'll even be inspired to use some myself ;)

Embellishments A-Z / Stephanie Valley
Newton, CT: Taunton Press, c1999.
168 p.
I'll start with this small coil bound book. It's part of a larger series by the Taunton Press, and has lots of interesting ideas in it. The techniques can be used for textile art, for quilting, and also for preparing personalized details in your garment sewing. There is a wide variety shown in this book, more than you'd expect for its size. 


The book is laid out in sections, with different techniques described in each. I'm particularly fond of things like bias binding and piping, so was pleased to see mention of them -- the only technique I hadn't seen before was shirred piping, when the casing for your piping is gathered up around the cord, giving it quite a decorative appearance. 

I also like the illustrations and suggestions for using basic stitching to great advantage, particularly in the couching and decorative machine stitching sections. I can see using these to decorate a panel of a garment before putting a piece together. 


In the section on machine embroidery, she also demonstrates bobbin work, which is using heavier decorative threads in the bobbin and stitching from the wrong side, essentially. And there is also information about the cable stitch, a raised, looped stitch made from setting your tension differently and using decorative threads. 


There are also ideas for fancier fabric manipulation -- the chapter on velvet is particularly fascinating. While I've seen velvet embossed with rubber stamps previously (she does go over this also) the part I found clever was using simple household items to create great effects. The velvet below has been embossed using a wire rack, but it looks fabulous. 


There are other ways to manipulate fabrics, like sewing all kinds of tucks -- pintucks, crossed tucks, etc -- an effect I really like. You might also want to slice and reassemble fabric using weaving techniques. I've tried a few of these kinds of projects when working on textile arts, but never thought about using them to create fabrics to use for clothing. It's giving me some ideas.


In each chapter, the projects move from easy to challenging, and are clearly marked as to their difficulty levels. There are many, many clear photographs of each technique, and clearly explained steps for each. 

If you're looking for a way to add an extra element of pizzazz to your projects, this is a good basic guide to some new decorative ideas. I would recommend it to anyone interested in adding something truly individual to a project or two. 


Friday, May 1, 2020

New York Butterick 6083


I had my Literary Sewing Circle project idea fairly early on. But somehow I found myself sewing right up to my own deadline again! I had a couple of projects to finish before I could get started on this one, and I am also finding that my focus and level of concentration is way down, and my sewing is much slower than usual.


However! Here it is. I was inspired by the trips that both Lydia and Charley make to New York during the story. Lydia and Jean-Philippe travel to New York to see her brother and to visit Jean-Philippe's sick sergeant. Lydia describes Benjamin's house, and the wharf, and the surrounding streets as they travel to see the Joncourt's house where the sergeant is staying. Charley, meanwhile, goes to New York to have her art dealer cousin Wendy look at the painting of the Bellewether, the one that keeps mysteriously getting turned back out in her office. Charley finds modern New York busy with all its bustling streets, gardens and people. 


All this New York talk made me think of a fabric I thrifted about a year ago. It is actually a 100% cotton sheet, with a wonderful stylized New York print of the street grid and some extra special elements of New York living, like Central Park and Taxis, appearing as little yellow accents. This hit of yellow also makes me think of Lydia. 


I knew I wanted to make something structured, so that any sheet I use doesn't look too much like its source when done. So I decided on a shirtdress but waffled between many patterns for a while. I finally decided on this 1988 "Family Circle" Butterick 6083 that has a bit of easy wearing feel to it but also some structure. It also has a style feature of epaulets at the shoulders, which I feel gives a little nod to Jean-Philippe's military uniform also. 


There were a few issues with the pattern - they assume that the sizes they draft for are women with tiny waists, for one. I had to add 3 inches to the size 16 waistband in order to get it fitted to my waist. I only added 1/2" to the side seams of bodice and skirt, though. The pattern has two pleats on each side of centre, and also some ease stitching when attaching to the waistband. Because I had made my waistband larger, the easing was not necessary. 


The hardest part of this whole dress, for me, was the collar. I don't know why I couldn't seem to get it right. It was very frustrating indeed. It's still a little bumpier than I'd like and I might just pick it off and recut a new collar from the scraps of the sheet, since there's quite a bit left.


I got the basic adjustments right -- mainly height ones -- had to shorten the skirt by 2" and took 1.5" out of the bodice length split between two places. But I seemed to have one issue after another with my sewing; I had to unpick the collar at one side and readjust the angle of an epaulet, I had to unpick the waist seam after I realized I had sewn one pocket down facing backwards, and I had to redo the hem in one place after my lining got bunched up. All these issues came from the same problem of focus that I've been finding in short supply lately. But they were all fixable, and fortunately I paid close attention when installing my buttonholes and they all worked out perfectly on the first try. 


I happily found the most cheery yellow contrast buttons in my stash of the right size and number, and used those for front closures and epaulets. And of course I added in some side seam pockets!

>
Because this is 100% cotton, to make it wearable without the skirt constantly sticking to itself, I added a grey lining to the skirt portion, as I have tons of grey bemberg in my stash. This makes the skirt feel a little fuller and allows it to hang freely and not get caught up around my knees.

As I always say, every dress needs a silver lining!
I enjoyed this light, satisfyingly happy ending book at this time of stress, and hope that everyone who participated in this round of the Literary Sewing Circle was able to enjoy as well. You can check out the link up post to see everyone's final projects.


Tuesday, April 28, 2020

Sewing Plans for May and beyond

Well, it's almost May and it looks like we still will be inside for the month ahead. I'd hoped that by this time I would have burned through my sewing queue, but everything has been taking me much, much longer to complete. My concentration and focus is way down, as I am sure it is for many others as well.

I am currently working on my own project for my Literary Sewing Circle; the current round closes on Friday so I'll have to post it soon -- but I have been having to redo so much of it as I go. It's nearly done now, though, and so I've been thinking about what I should tackle next. I have so many ideas I thought I should put them in order so I don't spend all my time dithering over what to try next instead of making something!

I only made 2 items this month (aside from various mending and such). So even with all the time I have at home, planning 4 items feels a bit ambitious right now. But plans are more like guidance, so here they are. I didn't realize until I laid these out that I was feeling so blue...

Burda 118 from the April 2020 issue + a floral rayon

Style Arc Lacey dress + a vintage rayon gifted to me ages ago.
 I've made this pattern before but in a heavy cotton
so this should look quite different!
New Look 6340 + floral rayon
Very Easy Vogue 9166 + denim look lightweight cotton (perhaps I
will topstitch with this golden thread as a nod to traditional jeans)

I am also hoping to trace out a bunch of pdf patterns that I have had on my list for quite a while. Fortunately before all this stay at home routine started I'd bought a new pack of my favourite tracing material, plant cover 'fabric' from the Dollar Store. There is a lot in a pack so I should be able to trace all these things, if I find the time to do it.

First, 3 more patterns from the April 2020 Burda magazine. If I ever get my May issue I'm sure there will be at least one more to trace from that issue!


I also want to trace two dresses, the Everyday Dress from In the Folds for Peppermint Magazine, and the Chalk & Notch Fringe Dress, which was top of my list for last summer when I bought it!


Finally, two very useful summer tops: the Sointu Tee from Named Patterns, and the Antero Shell Top from a recent capsule collection from Sew News. There are more tops I'd like to try, but I'll start with these two.


What about you? Are you making solid plans? Going through your stash for ideas? Sewing according to mood? Finishing UFOs? Taking up other hobbies or crafts? I am getting out some of my embroidery again as well and have been finding that very relaxing.

Whatever you are doing, I hope that you are staying safe and taking care of yourself in all ways.