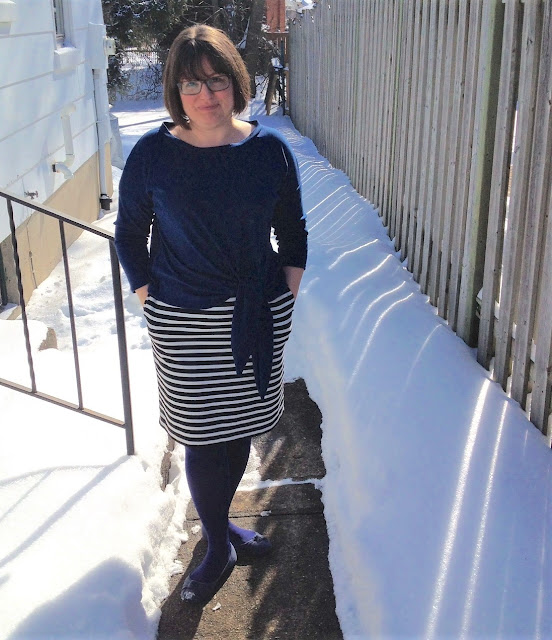
Meg of Cookin' & Craftin' proposed a Twists & Ties sewalong at the beginning of the year. It's a challenge to make up some of the many current patterns which feature, not surprisingly, a twist or a tie in their design.
I agreed with her when she noted that many of the projects in her queue had this kind of feature. I immediately put my hands on to at least 7 patterns in my long-term queue that have ties of some sort incorporated into their design (ie: not just a sash or belt attached afterward). I don't really have many twists but lots of ties. Nonetheless, I only got one of them finished by the deadline of the end of February for this challenge!
After I finished with the PR Sewing Bee after Round 3, I was all sewn out for a day or two. And then I needed something quick and fun so cut out this Burda Knotted Top from the 10/2016 magazine. (also found online here).
It was pretty quick, although as often happens with Burda instructions, I was left scratching my head over the step where one should attach the extra tie to the bottom of the shirt. I could not make head nor tails of it no matter how I tried. I looked online to see if anyone else had shared how they did it, and got a bit of help there, but in the end I just looked at the piece, looked at the top and figured out a way to do it which didn't leave raw edges. I don't know if it was the intended way but it worked and the ties sit properly and they tie, which is really all I can ask.
Here's how I did it.
The first tie is cut on as one with the front piece, with a facing. Easy. The second is a separate piece which must be attached to the bottom side. I fiddled around until I realized that I could sew the two tie pieces together, turn them right side out (leaving the section that would attach to the shirt unsewn and flat), then attach that through both layers like a band, and flip it into position. That way I could then fold under the remaining raw edge between the bands and hem it, topstitching over the tie part all the way to the side seam to keep the tie seam allowances flat as well. If I'd have taken pictures during the process it might have been more clear, though seeing as I was sewing on a dull navy I'm not sure how much you'd see of it anyhow!
Once again I had to do the neckband twice -- I can never get them right. I didn't follow the Burda instructions to put the neckband on before sewing up the second shoulder, I couldn't figure out why or how. So I left it to the end and attached it like a normal neckband, in my normal way, ie: badly. I tore it out (carefully to avoid stretching) shortened it and tried again. This time it is 'good enough'. I don't know why I have such a block about neckbands. Someday I'll get one put on well on my first try! At least I'm not on the Great British Sewing Bee and having to overlock one on in 5 minutes or anything...
Anyhow, it turns out to have a cute shape and the ties are sweet, even if I'm not sure they entirely suit me or my figure. I'm pleased to have figured out this pattern in any case, and enjoyed a quicker sew than most I've made lately. All of these non-competitive sewalongs/challenges lately are helping me get some of my projects done. And speaking of non-competitive sewalongs, I hope you've all checked out the Literary Sewing Circle on this blog and have a project in mind so you too can sew with us until the end of March!


It looks great on you, Mel and the color is perfect. It looks like such a simple sew. Why did Burda have to make it so difficult!
ReplyDeleteHa - Burda instructions! So much fun to decipher. It was a straightforward sew other than those ties. I'm pleased with the end result though I still think I need to figure out neckbands and get them done better in future!
DeleteI like this top too, but was wondering if it would suit my shape. As it looks nice on you, with similar profile, I think it would.
ReplyDeleteThanks! Yes, I think it's a nice fit -- the ties right at my widest part worried me but it seems okay :)
DeleteRe the neckline. One of the free Tessuti tops, I think the fave top, has a very interesting neck line detail. They put a small dart on each side of the neck hole after you have put the binding on. I am amazed at the difference it makes!!! It worked beautifully and gives the neck a better fit. So, if you have concerns about your neckline you may like to give this technique a try.
ReplyDeleteI think your top looks great and very wearable.
Oh, that is good to know! I'll check it out as I have downloaded that pattern. Maybe it will fix my neckband issues :)
DeleteI would be interested to know if it works for you. I was just surprised at the difference it made.
ReplyDelete