Showing posts with label twistsandties. Show all posts

Wednesday, February 15, 2023

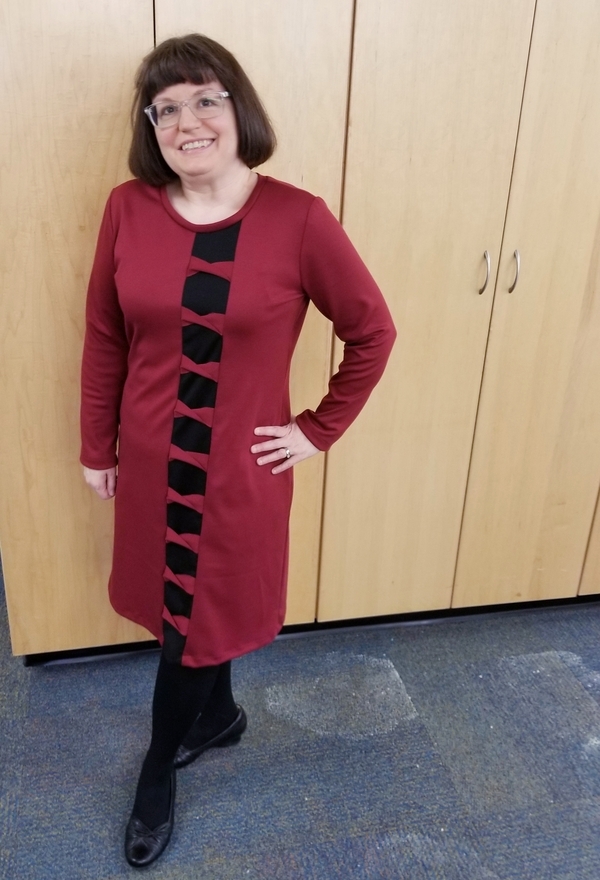
Red Ponte Dress with a Twist


The PatternReview Sewing Bee is underway once again! The first round challenge was set as "Knit Dress with Twist". Since dresses are my most common project I knew this one was for me. 

I puzzled a bit over what twist to add to my dress -- should it be a physical one? A conceptual one? I came up with a number of ideas and sketched them out but they felt very complicated. And I wanted to only make something I could wear, no stunt sewing for me this time around. 

Finally I thought of an idea that would look nice and be wearable. I had some burgundy red ponte in my stash that I've been wanting to use for a while now, and some scraps of black ponte from a recent Burda dress. They came together with the simple silhouette of Cynthia Rowley Simplicity 2054 to make this dress. This was a perfect pattern to use as there were no bust darts or extra seams to worry about.

To create a "twist" for this project, I inserted a strip of black ponte into the front pattern piece. This meant that I traced off the front pattern piece and split it into 3 pieces, remembering to add seam allowance to all the newly created seams. I made the insert off-centre (one edge was centre line) and at a 3" finished width, and added my twist feature to the insert. The twist is made with strips of the burgundy ponte, simply twisted once around at one end, and stitched down. The funny thing is that they are kind of like a mobius twist - I discovered that they can change the twist direction without my input. 

The other changes I made were to add pockets, using a cotton broadcloth. Using a woven for pocket bags helps to reduce stretching in the pocket area, I find. I also added 1.5" to the hem-- and I am quite short. This is a shorter dress as designed but I wanted it at knee length. I'm not much for short skirts! 

I really like the effect of the colour blocking in this dress, and it definitely wasn't one I was expecting to have in my closet prior to the Sewing Bee! This dress was enough to put me through to Round 2 of the Sewing Bee...and the challenge is Collars. And that's what I'm focusing on this week. We'll see how it goes!

Tuesday, March 5, 2019

Twisting & Tying with Burda


Meg of Cookin' & Craftin' proposed a Twists & Ties sewalong at the beginning of the year. It's a challenge to make up some of the many current patterns which feature, not surprisingly, a twist or a tie in their design.


I agreed with her when she noted that many of the projects in her queue had this kind of feature. I immediately put my hands on to at least 7 patterns in my long-term queue that have ties of some sort incorporated into their design (ie: not just a sash or belt attached afterward). I don't really have many twists but lots of ties. Nonetheless, I only got one of them finished by the deadline of the end of February for this challenge!

After I finished with the PR Sewing Bee after Round 3, I was all sewn out for a day or two. And then I needed something quick and fun so cut out this Burda Knotted Top from the 10/2016 magazine. (also found online here).


It was pretty quick, although as often happens with Burda instructions, I was left scratching my head over the step where one should attach the extra tie to the bottom of the shirt. I could not make head nor tails of it no matter how I tried. I looked online to see if anyone else had shared how they did it, and got a bit of help there, but in the end I just looked at the piece, looked at the top and figured out a way to do it which didn't leave raw edges. I don't know if it was the intended way but it worked and the ties sit properly and they tie, which is really all I can ask.

Here's how I did it.

The first tie is cut on as one with the front piece, with a facing. Easy. The second is a separate piece which must be attached to the bottom side. I fiddled around until I realized that I could sew the two tie pieces together, turn them right side out (leaving the section that would attach to the shirt unsewn and flat), then attach that through both layers like a band, and flip it into position. That way I could then fold under the remaining raw edge between the bands and hem it, topstitching over the tie part all the way to the side seam to keep the tie seam allowances flat as well. If I'd have taken pictures during the process it might have been more clear, though seeing as I was sewing on a dull navy I'm not sure how much you'd see of it anyhow!

Once again I had to do the neckband twice -- I can never get them right. I didn't follow the Burda instructions to put the neckband on before sewing up the second shoulder, I couldn't figure out why or how. So I left it to the end and attached it like a normal neckband, in my normal way, ie: badly. I tore it out (carefully to avoid stretching) shortened it and tried again. This time it is 'good enough'. I don't know why I have such a block about neckbands. Someday I'll get one put on well on my first try! At least I'm not on the Great British Sewing Bee and having to overlock one on in 5 minutes or anything...


Anyhow, it turns out to have a cute shape and the ties are sweet, even if I'm not sure they entirely suit me or my figure. I'm pleased to have figured out this pattern in any case, and enjoyed a quicker sew than most I've made lately. All of these non-competitive sewalongs/challenges lately are helping me get some of my projects done. And speaking of non-competitive sewalongs, I hope you've all checked out the Literary Sewing Circle on this blog and have a project in mind so you too can sew with us until the end of March!